Iron condors are a neutral option strategiy. A combination of selling a credit put spread and credit call spread, iron condorsprofit from the stock remaining range bound and a drop in implied volatility.
You'll build this strategy by selling an OTM short call spread and short put spread.
How to enter an iron condor:
- Ticker symbol
- Expiration
- Strike prices
- Position sizing
- Reward/risk
- Exit options
For example, if SPY is trading near 737, and you think it will stay relatively rangebound before expiration, you could open an iron condor with the short strikes out of the money, and buy long options $5 beyond the short strikes:
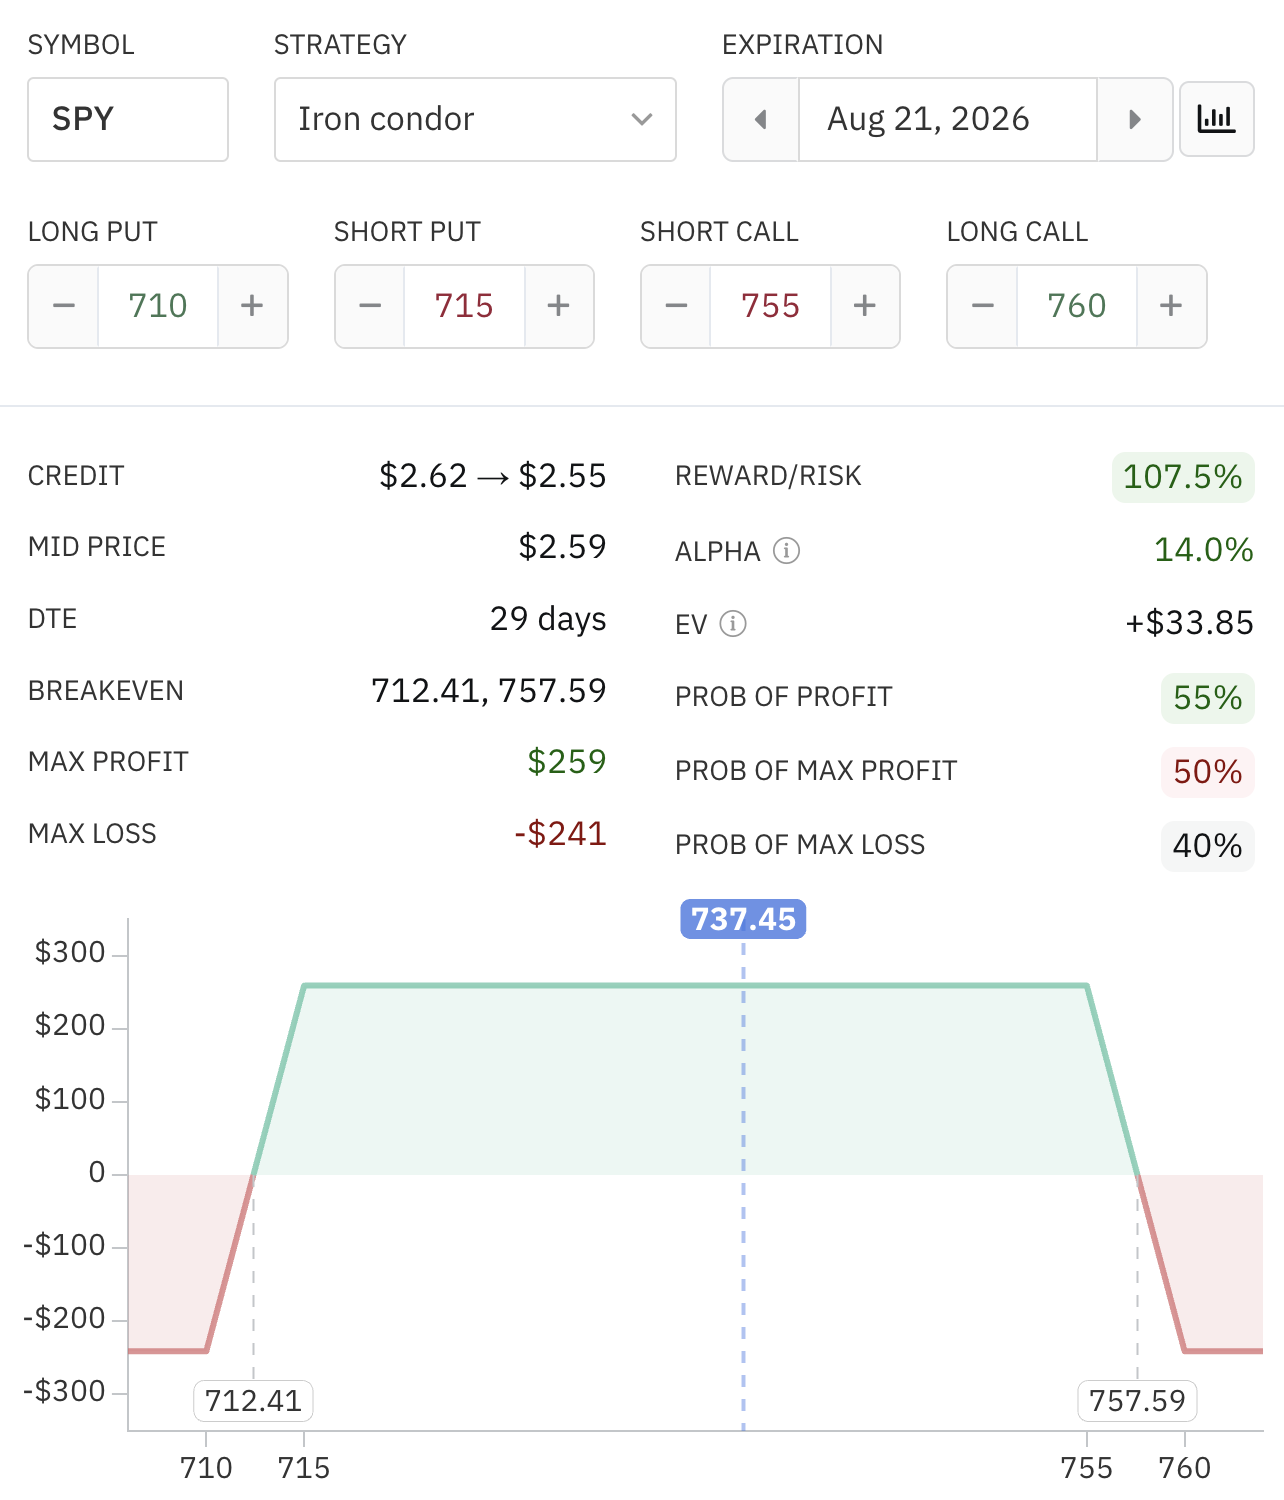
Current pricing yields a premium of $259. A position size of one contract has a max profit of $259 if SPY stays between 715 and 755, and a max loss of -$241 (if SPY closes below 710 or above 760 at expiration).
The position has a probability of profit of 55% and a favorable reward/risk of 107.5%.
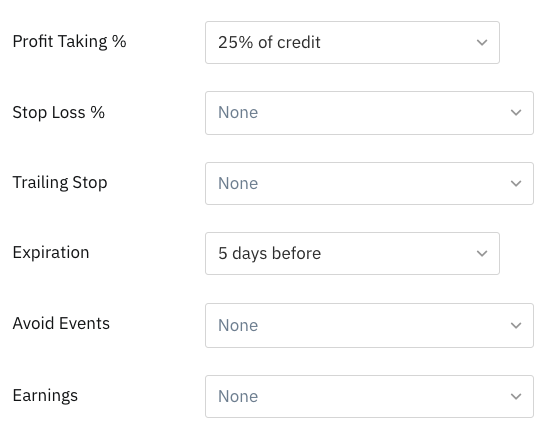
Adding Exit Options will monitor and manage the position for profit taking, stop losses, expiration, and more.
For example, this trade would be closed at a 25% profit or 5 days before expiration, whichever comes first:
|
Ready to build your trading plan? 
|


'%3e%3cg id='Final-Copy-2_2_' transform='translate(1275.000000, 200.000000)'%3e%3cpath class='st0' d='M7.4,12.8h6.8l3.1-11.6H7.4C4.2,1.2,1.6,3.8,1.6,7S4.2,12.8,7.4,12.8z'/%3e%3c/g%3e%3c/g%3e%3c/g%3e%3cg id='final---dec.11-2020'%3e%3cg id='_x30_208-our-toggle' transform='translate(-1275.000000, -200.000000)'%3e%3cg id='Final-Copy-2' transform='translate(1275.000000, 200.000000)'%3e%3cpath class='st1' d='M22.6,0H7.4c-3.9,0-7,3.1-7,7s3.1,7,7,7h15.2c3.9,0,7-3.1,7-7S26.4,0,22.6,0z M1.6,7c0-3.2,2.6-5.8,5.8-5.8 h9.9l-3.1,11.6H7.4C4.2,12.8,1.6,10.2,1.6,7z'/%3e%3cpath id='x' class='st2' d='M24.6,4c0.2,0.2,0.2,0.6,0,0.8l0,0L22.5,7l2.2,2.2c0.2,0.2,0.2,0.6,0,0.8c-0.2,0.2-0.6,0.2-0.8,0 l0,0l-2.2-2.2L19.5,10c-0.2,0.2-0.6,0.2-0.8,0c-0.2-0.2-0.2-0.6,0-0.8l0,0L20.8,7l-2.2-2.2c-0.2-0.2-0.2-0.6,0-0.8 c0.2-0.2,0.6-0.2,0.8,0l0,0l2.2,2.2L23.8,4C24,3.8,24.4,3.8,24.6,4z'/%3e%3cpath id='y' class='st3' d='M12.7,4.1c0.2,0.2,0.3,0.6,0.1,0.8l0,0L8.6,9.8C8.5,9.9,8.4,10,8.3,10c-0.2,0.1-0.5,0.1-0.7-0.1l0,0 L5.4,7.7c-0.2-0.2-0.2-0.6,0-0.8c0.2-0.2,0.6-0.2,0.8,0l0,0L8,8.6l3.8-4.5C12,3.9,12.4,3.9,12.7,4.1z'/%3e%3c/g%3e%3c/g%3e%3c/g%3e%3c/g%3e%3c/svg%3e) Your Privacy Choices
Your Privacy Choices